How To Set Up A Website For Free (With Photos)
When it comes to websites you have what the world can see, then you have what only you can see.
What only you can see is called your website’s “back office.” This is where you control what the world can see and where the initial website set up will take place.
In this post I’ll be sharing with you how to set up a website for free. We will be taking a look around your website’s back office while walking though the initial set up. We will also be activating pre installed plug ins and removing default content.
If you haven’t already created a website you can go to my best free website builder post here. Get 2free SiteRubix websites and create your very own website in less than 30 secs.
Task #1: Logging Into Your Website’s Back Office
SiteRubix is the WordPress website builder that I use. Because it is a State of The Art All in One website builder that is located right inside my Online Training Platform. I can easily assess my websites straight from within training platform.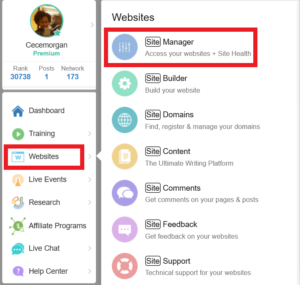
(screenshot inside my membership)
Look to the left hand menu and click websites.
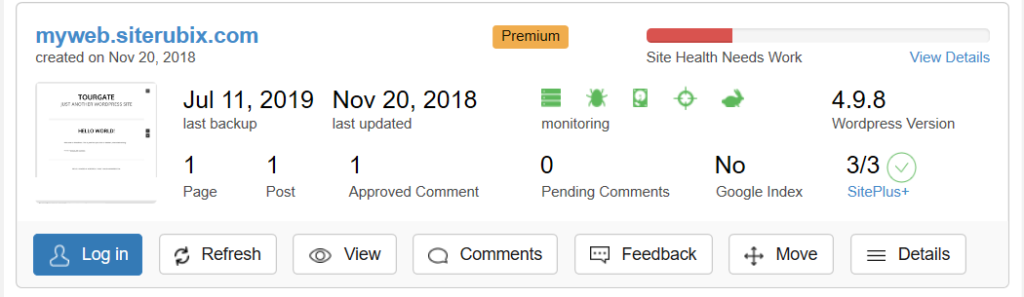
Select Site Manager– This is your Site Manager dashboard. From here you can manage things like, your websites comment section, monitor your website over all site health, request website feedback from the community and login.
 If you click on the details link within the site manager dash board. You can find your website’s login details, password, and username.
You can even log into your website without a manual password with the log in button. Your logins are encrypted and secure with SiteRubix’s technology.
You will automatically see any users that are associate with your website after clicking the log in button.
After logging in, you will see your WordPress administration dashboard for your website. It will look like this. 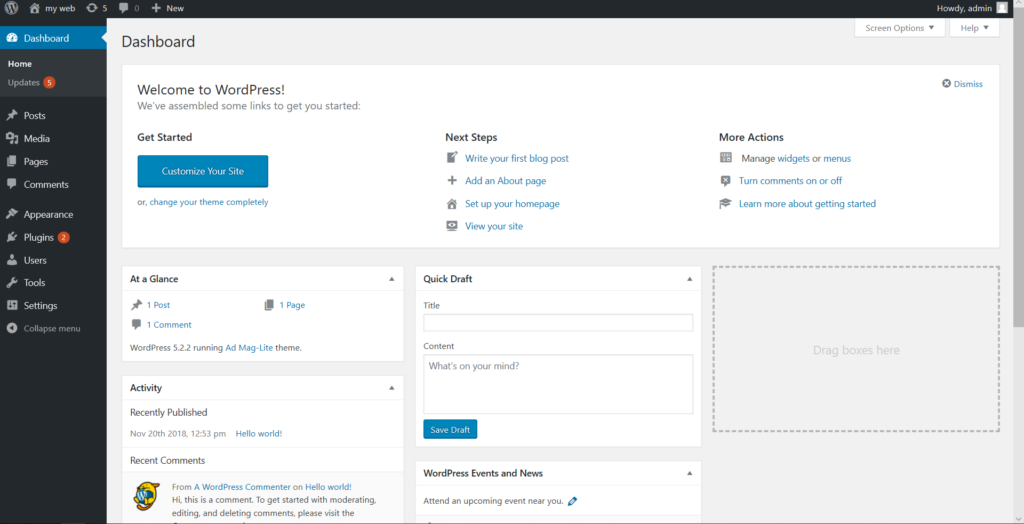
If you haven’t ever logged into a wordpress website things may look a lil diffenrent to you and that’s ok.
You’ll have tons of help available to you within the online training community, including myself. We will help you through any questions/issues that you may have. See my review on my online training here.
WordPress is by far one of the most powerful and widely used website platforms and has a wide range of add ons that extends the fuctionality of your website known as “plugins”.
There are over 40,000 different plugins that you can install on your website. Everything from social plugins that allow your visitors to share your posts on Facebook/Twitter/etc, to e-commerce plugins that allow you to sell your own products directly from your website.
Pretty much anything you want to do to your website, there is a plugin for.
Task #2: Activating Your Website’s Plugins.”
When you install websites on SiteRubix’s platform, your websites already comes pre installed with three of the most useful plugins. Activating those plugins are going to be your first step.
![]()
First you will see the All in One SEO plugin I go over the set up here. This is the plugin that helps you get ranked and found in search engines like Google, Bing, and Yahoo.
Then, you will see the Classic Editor plugin This plugin will make life a whole lot easier for you vs the new and more modular editor. especially if you are just getting started. It is already set up for you so there is nothing for you to do on your end.
Lastly, the Kraken Image Optimization plugin is going to automatically compress and optimize all of the images on your website.
Large unoptimized images are the main reason for slow loading websites This can have a negative impact for your website, in particular your search engine rankings.
Kraken’s sophisticated and advance technology is going to lead to a better user experience, better website speed, and better search engine rankings.
Go ahead and activate these plugins simply select activate and click apply. (shown in the photo above with red arrows)
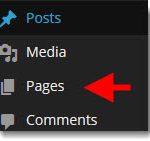
Task #3: Delete Default Posts, Pages and Comments
Every wordpress website that you create will come with default or dummy content. So, the first thing you need to do is delete the default content that comes with every website install.
Click on Posts within the side menu.
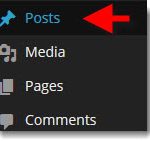
This will take you to the post page where you will go to see a list of all post that have been created on your site. Unlike pages post allows your viewers to comment and this is where majority of your content will be created.
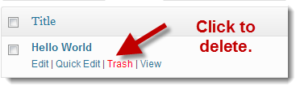
When you “mouse over” the post area you will reveal the post managements buttons. Click on trash to delete the default
“Hello World” default post.
If you ever accidently delete a post, you can click the “undo” button. Your post will reappear in your posts list. Deleted post are saved in the trash bin for a few days before being permanently deleted.
Follow this same process with the Pages and Comments links.
That’s all it takes for the initial website setup. Logging into your websites back office, activating your pre installed plug ins and deleting default content.
You now have a live website that is set-up and ready to go. This website is your foundation for building a successful online business. Your website is your very own. Internet “real estate”. You will use this website to connect with your target audience (your niche).
Coming Soon! My next post “Getting Your Website Ready to Rank in Google and other Search Engines.”
Thank you for stopping by selflessmoney.com. Let me know how the initial website process worked out for you in the comment section. My #1 goal here at selflessmoney.com is to selflessly share with you how to make money online.
Click right here to access the same exact trianing platform that I use its 100% FREE to you! Just fill in your email, create a username and password and that’s it!
P.S. As Soon as you create your membership I will connect with you and follow you. See Ya Soon!
Your friend,
Sierra Morgan
selflessmoney.com